#
Branching Policy
The IBP project uses a release-based branching strategy that organizes code changes into clear streams of work. This approach provides transparency to product, development, and infrastructure teams while enabling flexible deployment of independent features to different environments.
#
Branch Types
Our CI/CD pipeline automatically deploys code to different AWS environments based on specific branch names. Understanding this structure is crucial for proper development workflow.
#
Long-lived Branches
We maintain a series of branches that correspond directly to our AWS deployment environments. Any code committed to these branches will trigger automatic deployment to the associated environment. Our BPO-Dev AWS environment contains environments dev, qa and preprod1.
ℹ️ These branch names represent the desired state of our AWS environment. We are in a heavy refactoring effort to provide alignment and consistency.
These Environment branches form the backbone of our deployment pipeline, enabling consistent and reliable delivery across various stages of our lifecycle.
#
Short-lived Branches
While our environment branches establish our deployment targets, we use short-lived branches to organize active development work. These are the different types that exist in our environment. Further details and a full walk through follows this section.
Feature branches focus on individual units of work
- Created from the prod branch (except hotfixes, which branch from release tags)
- Should focus on a single task or related set of changes
- Requires code review before merging into dev
- Once stable and passing acceptance criteria, a pull request can be sent to a release branch.
Release branches collect all work related to a specific release:
- Created in tandam with the beginning of a new release cycle
- Serves as an integration points for feature branches that are ready to be shipped
- Used for deploying across environments
- Used for hotfixes when in-between releaes
❓ What if we aren't on the same release cycle as legacy?
✅ We can use the sprint number in the same manner - eg:s-108
#
Release Tags
Beyond our branching strategy, we use a systematic tagging approach to mark versions of our codebase. These reference points are crucial for tracking releases, developing hotfixes, and maintaining deployment history.
Release tags provide permanent reference points that identify code versions deployed to production. They allow us to track what code is running in each environment and provide access points for hotfixes when needed.
- Applied to the final commit at the conclusion of a release
- Used as reference points for deployment to specific environments
- Format follows release number with an iterative number value
- Enables quick identification and access to specific code versions
#
Deployment Pipeline
🚧 Note: Our deployment process is evolving from a sequential pipeline to a release-based deployment model. This change will allow for more granular control and faster iteration cycles.
#
Current
---
title: Sequential Deployment
---

flowchart LR
  Dev ==> QA
  QA ==>PreProd1
  PreProd1 ==> PenT
  PenT ==> Prod
Our current workflow follows a strictly sequential deployment path where code must progress through each environment in order:
- Developers create feature branches off dev
- Feature branches are merged into dev
- Code is then promoted through each environment sequentially: dev → qa → preprod1 → pen-t → prod
While this approach provides a structured promotion path, it presents several challenges:
#
Deployment Bottlenecks
- Fixed Release Cadence: All feature deployments must follow the same full path, even for small changes
- Dependency Chains: Features ready for production must wait for all features ahead of them in the pipeline
- Slow Feedback Cycles: Developers receive production feedback only after full cycle completion
- Environment Congestion: Multiple features must share testing environments simultaneously
#
Limited Flexibility
- All-or-Nothing Deployments: Features in a sprint branch must move together, complicating targeted rollouts
- Complex Hotfixes: Emergency fixes require special branching patterns that bypass normal workflow
- Difficulty Rolling Back: Reverting specific features is challenging when they're bundled with other changes
- Environment Drift: Long promotion cycles can lead to significant differences between environments
This sequential approach works for predictable release cycles but lacks the flexibility needed for modern continuous delivery practices. Our evolving strategy aims to address these limitations while maintaining necessary controls and quality gates.
#
Target
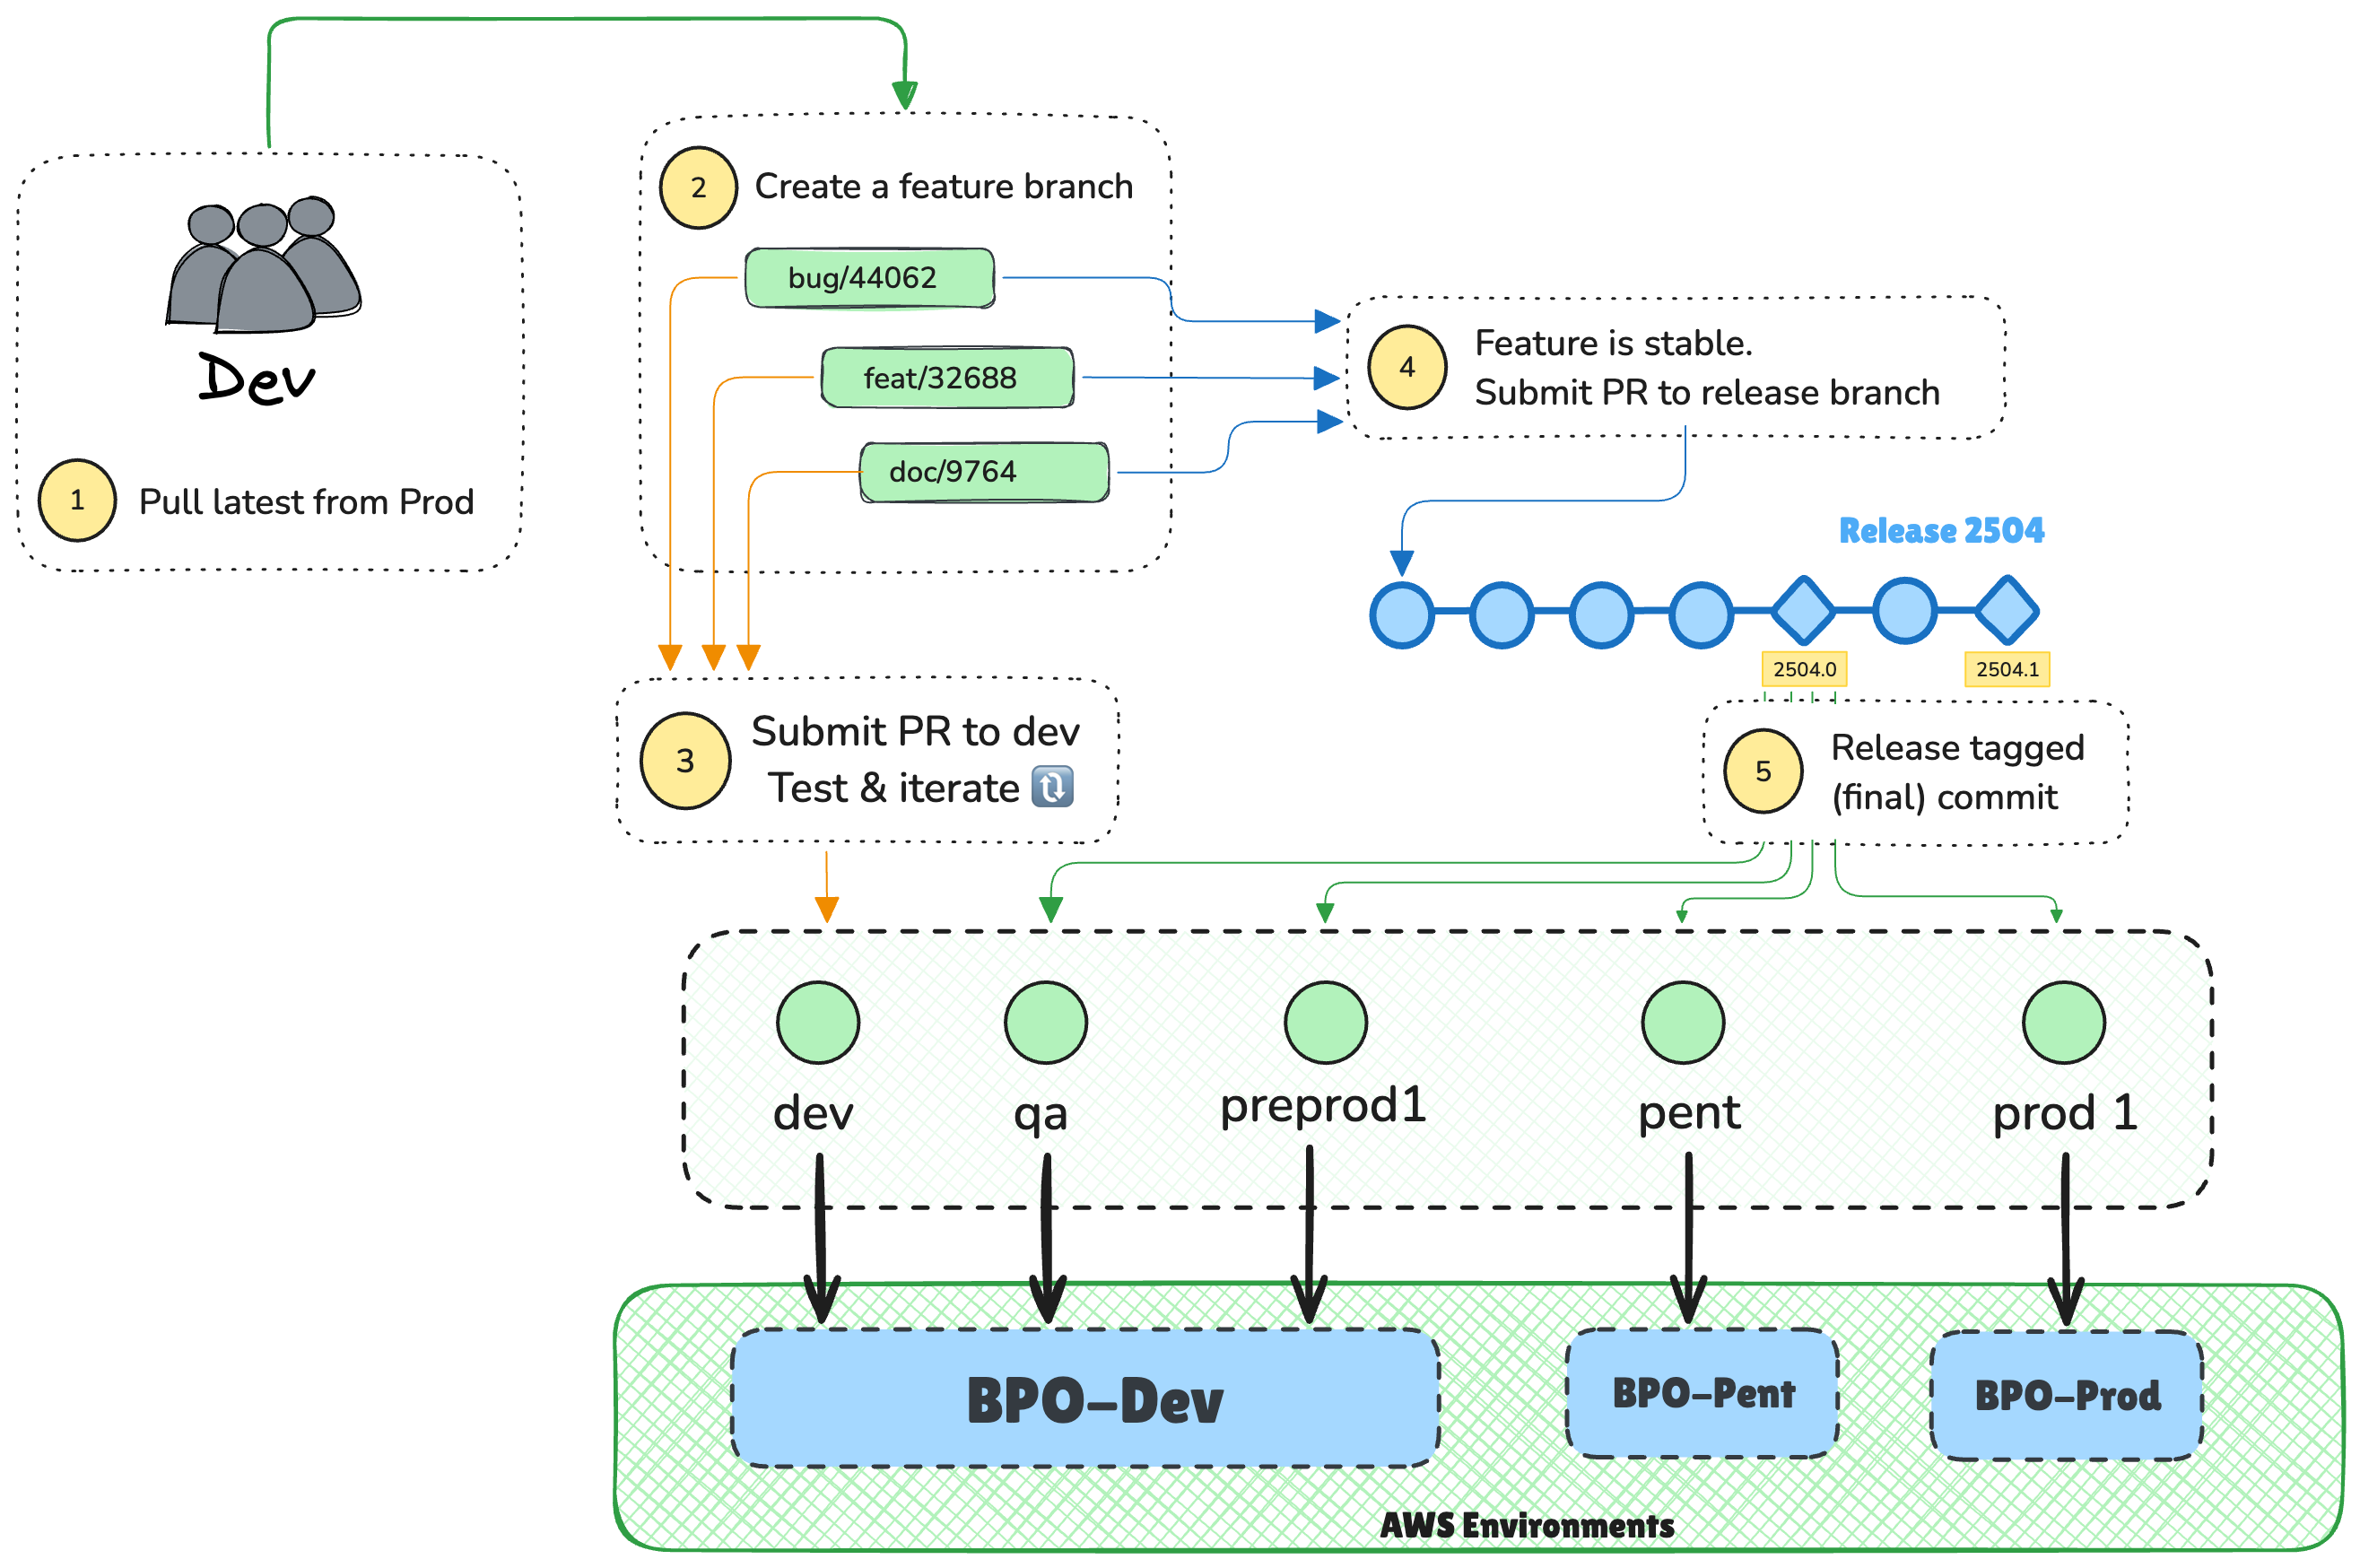
To address the limitations of our current workflow, we're transitioning to a more flexible release-based deployment approach. This evolution will enable faster delivery without sacrificing quality or stability.
---
title: Feature Branch Deployment
---
flowchart LR
  dev <-.- feat/shiny-new-feature
  feat/shiny-new-feature ==> 2504
  dev <-.- bug/security-fix
  bug/security-fix ==> 2504
  dev <-.- doc/update-readme
  doc/update-readme ==> 2504
  2504 -.-> 2504.0
  2504.0 ==> Dev
  2504.0 ==> QA
  2504.0 ==> PreProd1
  2504.0 ==> PenT
  2504.0 ==> Prod
#
Benefits of Our Future Approach
Our new strategy introduces a more direct path from feature/release branches to environment branches, offering several key advantages:
#
Enhanced Deployment Flexibility
- Feature-Based Deployments: Individual features can be deployed independently, allowing for targeted releases
- Parallel Promotion Paths: Critical features can follow accelerated paths while routine changes follow standard promotion
- Granular Control: Each feature can be evaluated and promoted on its own merits and timeline
- Simplified Feature Flagging: Direct deployment facilitates feature flag implementation for controlled rollouts
#
Improved Development Efficiency
- Faster Feedback Cycles: Developers receive production feedback more quickly with shorter promotion paths
- Reduced Merge Conflicts: Eliminating sprint branches reduces integration complexity
- Clearer Ownership: Direct release-to-environment flow maintains clear accountability throughout the lifecycle
- Simplified Rollbacks: Individual feature deployments can be reverted without affecting other work
- Independent Testing: Features can be tested individually in higher environments without waiting for full sprint completion
#
Sprint Workflow
#
1. Sprint Initialization
At the beginning of each sprint or release cycle the team lead should create a new sprint/release branch.
# Checkout the prod branch
git checkout prod
git pull

# Create a new sprint/release branch
git checkout -b 2504  # s-108 for sprint based releases
git push -u origin 2504
This release branch serves as the foundation for all work in the current release.
#
2. Feature Development
For each new piece of work, the developers should create a new feature branch.
# Checkout the prod branch
git checkout prod

# Get the latest
git pull

# Create a new feature branch with semantic branch names
git checkout -b feat/user-authentication  # For a new feature
# OR
git checkout -b fix/login-timeout  # For a bug fix
# OR
git checkout -b docs/api-documentation  # For documentation changes

# Work on your user story and do your local testing
# Avoid using git add . - Add only the files that are ready to be pushed
git add README.md

# Create a useful commit message to share with the team. Using the semantic commit messages
git commit -m "doc: Added some edge cases to the documentation"

# Push the feature branch to remote
git push -u origin feat/user-authentication
#
Semantic Branch Reference
All feature branches must follow this semantic naming convention:
Example branch names:
feat/user-authenticationfix/login-timeoutdocs/api-documentationrefactor/payment-processor
#
3. Create Pull Requests
While working on a feature, commit your code to your origin (Azure DevOps) frequently. When your feature is ready for integration testing beyond local development, create a pull request as follows:
Make sure your local branch has been pushed up:
# check status
git status

# Make sure all the files you want are not in staging

# Push up to Azure DevOps
git push -u origin <feature-branch>
Create a pull request in Azure DevOps:
- Target branch: dev branch
- Source branch: your feature branch (e.g.,
feat/user-authentication) - Title: Use semantic prefix with clear description (e.g., "feat: Implement multi-factor authentication")
- Description: Include details about changes and how to test for your reviewer
- Link the related work item(s) from the sprint
The PR triggers automatically validated:
- Build validation pipeline runs to verify linting issues, security concerns and unit tests
- Required reviewers are automatically added based on path filters
- Policy checks are displayed in the PR status
After approval and successful build, complete the PR:
- The changes will run int the pipeline to the dev environment
#
4. Test & Iterate until stable
The dev environment is a playground where you can validate your code & run your testing to ensure it meets acceptance criteria. Continue using your feature branch for any additional changes that may be required. Perform step #3 until you feel that the code is stable.
Once your code is stable and meets all acceptance criteria, create a new pull request targeting the release/sprint branch created in step #1. This stages your changes for the upcoming release.
If you require a change to be pushed into qa, the infra team will create a PR and merge your changes into the target environment.
#
4. Sprint Completion
At the end of the sprint the team lead will tag the last commit in the release/sprint branch as
1.
git checkout 2504
git pull
git tag 2503.0  # Replace with your release number
git push origin 2503
This tag marks the sprint's completion and will be used for deployments to the upper environments.
#
Hotfix Process
Checkout the production release tag:
git checkout 2504.0
git pull
Create a hotfix branch:
git checkout -b fix/1234 # Use a descriptive name or ticket numberMake changes, commit, and push:
git commit -m "fix: critical issue X"
git push -u origin fix/1234
Create a PR back to the release branch:
- This PR will ensure that the hotfix is associated with the appropriate release
- It will also help the git history stay accurate.
Deploy to
targetenvironment for testing:- Create a PR from the release branch to the environment where you want to test this change. Preprod1 and PenT should closely resemble prod.
- Test and verify
Create a PR to
prod1in Azure DevOps (Infra team):- This PR will be subject to the policies set on the
prod1branch - Special approval may be required for hotfixes
- This PR will be subject to the policies set on the
After the PR is completed, tag with a point release:
git checkout 2504
git pull
git tag 2504.1
git push origin 2504.1
Back fill the remaining environment branches:
- Ensure the hotfix is also applied to other branches by creating a PR from the new tag (2504.1) to each environment.
#
Branch Lifecycle Management
- Keep the last 6 release branches active
- Older release branches can be delete
- Clean up feature branches after they're merged and the sprint is complete
#
Best Practices
Keep branches synchronized
- Regularly merge the main branch into feature branches
- Merge completed features into the release branch only when ready
Write meaningful commit messages
- Follow conventional commits format:
type: description - Include ticket numbers
- Example:
feat: Implement multi-factor authentication (IBP-123)
Create focused pull requests
- Each PR should address a single concern
- Easier to review and less likely to introduce bugs
Never bypass code review
- All changes must be reviewed before merging
- CI checks must pass
Handle merge conflicts promptly
- Regularly sync with parent branches to minimize conflicts
- Resolve conflicts in your feature branch before creating a PR
Document branch purposes
- Include a brief description in the PR
- Reference related tickets or requirements
- Include how you tested your change and how you suggest the reviewer test
Questions about the branching strategy should be directed to the Automation Team.
Azure DevOps branch policies documentation: Branch policies and settings.